Pages

Tuesday, April 30, 2019

Release Hop for May ~ Day 2 ~ Caffeinated Shark & Sassy Sentiments


Hello and welcome to Day 2 of the release hop. We are so excited for you to join us as we present to you our May release.  Our fabulous Design Team will be sharing their projects today featuring the stamp sets Caffeinated Shark & Sassy Sentiments so be sure to visit their blogs and leave them some crafty love.

All of the new stamp sets are available to purchase right now in the shop.
 ~
*FREE SHIPPING 
on orders of $25 or more before taxes and shipping
(applies to US orders only)
No code necessary, exclusions apply
*until 05-10-2019


The stamp sets that are being highlighted today are: 

Caffeinated Shark


**Giveaway**
To celebrate day 2 of the release The Rabbit Hole Designs is giving away the stamp set Caffeinated Shark to One lucky winner.  Winner will be chosen at random from the comments left on participating blogs, so make sure to visit each stop and leave a comment.  Leave comments by 11:59 pm PST 05-02-2019 on all participating blogs. Winner will be announced on The Rabbit Hole Designs blog 05-03-2019

Here is the line up for the hop:

Katie Brooks
Maria Russell
Lynnea Hollendonner
Amanda Stevens
Martha Lucia Gomez
Lisa Golzbein
MaryAnn Samuelson

Make sure you come back tomorrow for Day 3 of our release HOP.


Thank you so much for stopping by today!

Monday, April 29, 2019

Release Hop for May ~ Day 1 ~ Caffeinated Rabbit & Perfectly Blended


Hello and welcome to Day 1 of the release hop. We are so excited for you to join us as we present to you our May release.  Our fabulous Design Team will be sharing their projects over the next few days, so be sure to visit their blogs and leave them some crafty love.

 The 5 (Five) new stamp sets are available to purchase right now in the shop.
~
*FREE SHIPPING 
on orders of $25 or more before taxes and shipping
(applies to US orders only)
No code necessary, exclusions apply
*until 05-10-2019

The stamp sets that are being highlighted today are: 

Caffeinated Rabbit
Caffeinated Rabbit 3x4 Clear Stamp


Perfectly Blended Sentiments 4x6 Clear Stamps


**Giveaway**
To celebrate day 1 of the release The Rabbit Hole Designs is giving away the stamp set Caffeinated Rabbit to One lucky winner.  Winner will be chosen at random from the comments left on participating blogs, so make sure to visit each stop and leave a comment.  Leave comments by 11:59 pm PST 05-02-2019 on all participating blogs. Winner will be announced on The Rabbit Hole Designs blog 05-03-2019

Here is the line up for the hop:

Katie Brooks
Maria Russell
Lynnea Hollendonner
Amanda Stevens
Martha Lucia Gomez
Lisa Golzbein
MaryAnn Samuelson

Make sure you come back tomorrow for Day 2 of our release HOP.


Thank you so much for stopping by today!

Tuesday, April 16, 2019

Guest DT for Kat Scrappiness ~ Get Well Soon ~ 2

Good Morning Dreamer'z!!

Today I am up on the Kat Scrappiness Design Team Blog as a Guest Designer.  I have been a long time customer of all things Kat Scrappiness as her fast shipping and great prices keep me coming back.
So during the month of April I will be posting a few different projects using her exclusive product along with products you can easily shop for on her website.


Today's card use's the new Crafters Essentials Easter Edition Dies along with a few other Dies from her exclusive line.  I will be sure to add links to the items in the card recipe below.

Die cut lots of chicks to create a stencil


Colors of Oxide Ink I used


  • On an A2 sized side fold card base of Neenah 110lb Classic Crest Cardstock I placed a strip of post it tape along the score line just to the backside of the card.  I like doing this because it gives the edge a nice finished look when the card is folded. 
  • Tape down your homemade stencil. I used yellow painters tape because it is low tack yet still holds everything in place.
  • For my blending I used some makeup brushes that are all the rage right now to blend my Distress Oxide inks in a rainbow pattern on the card base. TIP: you cannot be overly vigorous doing this because the stencil is made from cardstock and the tiny spots where the chicks feet are will bend.
  • While the blending looked great it still seemed rather blah to me overall so I cut a piece of silver shimmer cardstock to A2 size and then die cut a rectangle from the center of it to create a frame around the card front.
  • Again I was faced with still not enough "POP" in my eyes on the look.  So I grabbed a piece of Gina K Designs Passionate Pink paper and I used the Stitched Fancy Scalloped Rectangle Die to create another frame which I die cut a rectangle from the center of. 
  • Finally happy with how the blended card front was going to look I used a fun sentiment from my stash stamped it with Versafine Clair Ink in the color Nocturne.  I have found that this ink gives a nice solid look and coverage over Oxide inks and if you wanted you can use embossing powder over the top of it as it stays wet enough to grab the embossing powder, yet dries smudge free in seconds (Pure craft magic I tell ya!)
  • Nuvo Deluxe Adhesive was used to attach the silver shimmer frame and the Passionate Pink frame on top of the card front.
  • Lastly I added a couple of Confetti Sequins.
~
That is all for me today.  I hope I have inspired you to maybe give this technique a go and create some fast and easy cards.
~
Thank you for stopping by for a few minutes!
MaryAnn
~
For more inspiration, updates, and news make sure to check out these places:
Kat Scrappiness Blog

Stamping Enablers

Sunday, April 14, 2019

The Rabbit Hole Designs ~ Love You More ~ Anniversary Card


MaryAnn, from PaperDreamz here to share a really easy to make card with you that features the images from the
The Rabbit Hole Designs set Love You More


Card Recipe
  • Create a stamped with versamark watermark ink and clear powder heat embossed background on Neenah Classic Crest White 80lb cardstock using the smaller elements from the stamp set "Don't forget to use your anti-static powder on the panel before stamping" 
  • Grab your favorite blending tools and some inks and set about blending them on the panel any way you wish.  Honestly there is no wrong way here, just go with it!
  • I then stamped the couple with a Copic friendly ink and die cut the panel on a slant.  I found it really easy to do with rectangle dies so I could have a nice finished edge. 
  • I am no pro at Copic coloring of people so I quickly grabbed some markers and gave the stamped image a quick pass with some color. 
  • I stamped the sentiments on the left over piece of cardstock at the bottom of the now diecut couples panel lined it up and gave a quick stamp and I was happy.  Now to assembly.
  • To adhere the ink blended panel to the 110lb card base I used Tombow Multi glue in the green bottle. For the couple panel I added 3D mounting foam to the back of the panel and attached to the top left edge flush top and left of the ink blended panel. I repeated the mounting foam with the sentiment strip but left a bit of space between so you can see some of the background peeking thru. To finish off this card some pink confetti sequins and a couple of clear heart shaped drops that I used some red glitter glue to adhere to the front, give the card a nice pop of sparkle and shine.

For more inspiration, updates, and news make sure to check out these places.

That is all for me today.  I hope I have inspired you to maybe give this technique a go and create some fast and easy cards.
If you are looking for further details about my project including links to instruction and products not listed please feel free to drop on by my blog
PaperDreamz
Thank you for falling down The Rabbit Hole for a few minutes!
MaryAnn

Tuesday, April 9, 2019

Guest DT for Kat Scrappiness ~ Easter ~1

Good Morning Dreamer'z!!

Today I am up on the Kat Scrappiness Design Team Blog as a Guest Designer.  I have been a long time customer of all things Kat Scrappiness as her fast shipping and great prices keep me coming back.  So when Kat herself asked me if I would like to be a Guest on her Design Team of course I had to say yes!! 
So during the month of April I will be posting a few different projects using her exclusive product along with products you can easily shop for on her website.

Card #1

Card #2


Today's cards use the new Crafters Essentials Easter Edition Dies along with a few other Dies from her exclusive line.  I will be sure to add links to the items in the card recipe below.


Diecut a couple bunnies

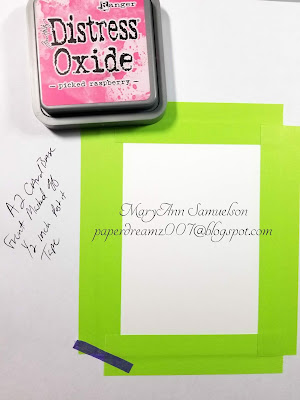
Create a couple of masked off panels using post it note tape
  • Grab your favorite blending tools and the ink of your choice.  For these 2 cards I used Picked Raspberry Distress Oxide Ink and set about blending the bunnies from the bottom up just place the bunnies on the panel any way you wish and give it a light blend around the edge of the die cut.  Honestly there is no wrong way here, just go with it!

  • For card #1, I masked off the ink blended bunnies and applied a splatter of Picked Raspberry Distress Ink and some Black Shimmer watercolor from my stash. when the panel was dry I used Stitched Fancy Scalloped Rectangle Die centered over the panel to give it a fancy and flirty look. A piece of Gina K Designs Passionate Pink paper and Gina K Designs Black Onyx paper were cut down and used as layers beneath the bunny blended panel.  All panels were attached atop a top folding A2 sized card base of Neenah 110lb Classic Crest Cardstock I used Nuvo Deluxe Adhesive for all my adhesive on my cards today.  I like how it did not cause any warping and gave me just enough time to position the panels all in place
  • For card #2 all steps are the exact same except I masked this panel to allow for a bigger pattern.  I used the largest of the Stitched Fancy Scalloped Rectangle Die to cut the panel, and again to cut a panel from the Gina K Black Onyx paper which I used as a frame, I diecut a rectangle from the center of it.  I glued the black onyx frame to the top of the blended bunny panel and then affixed it to the top of a side folding A2 sized card base of Gina K Designs Passionate Pink cardstock.  I still felt the card needed something so I grabbed a simple script Happy Easter sentiment stamp from my stash and stamped it with Versamark embossing ink and used a pale pink embossing powder on a scrap piece of Black Onyx paper, applied a strip of double sided foam tape and affixed to bottom of panel as shown.  
~
That is all for me today.  I hope I have inspired you to maybe give this technique a go and create some fast and easy cards.
~
Thank you for stopping by for a few minutes!
MaryAnn
~
For more inspiration, updates, and news make sure to check out these places:
Kat Scrappiness Blog

Stamping Enablers


Wednesday, April 3, 2019

The Rabbit Hole Designs ~ Mr. & Mrs. Wedding Card


Good Morning Dreamer'z

Today is my day on The Rabbit Hole Designs blog and I want to share an easy to make card with you that features the one of the images from
The Rabbit Hole Designs set Happily Ever After

Today's card was easy to make and required very minimal supplies which in the end really gave this card a very rustic yet sophisticated look


Card Recipe
  • I took a piece of cream colored shimmer paper from my local craft store and cut a 5x5 inch square from it and stamped the couple dead center with Memento Tuxedo Black ink and set it aside to dry
  • I then took a 8.5 x 11 inch piece of kraft card stock and cut it down to 5.5 x 11 inches and scored in the center creating a 5.5 x 5.5 card base.
  • Another piece of kraft cardstock was used to create a 5.5 x5.5 inch panel. 
  • From my stash I had already chosen a heart shaped die that fit perfectly around the couple and still fit on the kraft panel, I die cut the heart from the center of this panel then stamped the Mr. & Mrs. in the lower right corner.
  • I picked a few colors of Copics in the grey and pink family and gave a quick color to the couple as shown, then applied some adhesive and attached it to the center of the folded kraft card base
  • Double sided foam tape attached to the backside of the die cut panel was all that I needed to finish this card off and add a bit of dimension
For more inspiration, updates, and news make sure to check out these places.

That is all for me today.  I hope I have inspired you to maybe give this technique a go and create some fast and easy cards.
~
Thank you for falling down The Rabbit Hole for a few minutes!
MaryAnn
~


Template by BloggerCandy.com | Header Image by Freepik