Pages

Wednesday, December 23, 2015

A Lacy Coloring Extravaganza!!!!

Good Morning Dreamers,
If you have been following my blog for any amount of time you have seen me putting up projects with a lot of Lacy Sunshine digi's.  I just love these digi's to bits.  So this morning while I don't have a project to share with you I do have a couple of special things to share. 

2 new sets of coloring pages have been released and they are so cute.


This one is simply adorable and can be found here Eleanor & Pickles Coloring pages
Can you believe you can get all these digi's for only 12.00 Almost unheard of in the digital stamp world!!

The second set has a great variety of images take a peek

 
There is a little bit of something for everyone in this set!! and again I am promoting this set not just because it is simply Ah-Dorbs but because of the fantastic price on this set of only 9.00

So what are you waiting for get your Lacy Sunshine images!!! I know what Santa is bringing me in my stocking!!! 


Thursday, December 17, 2015

Palette Challenge

Good Morning Dreamers,
With Christmas fast approaching I am finding it more and more difficult to get to my craft room to create.  Seems I am in a constant state of "Gotta get this accomplished" for the upcoming holiday.  I did take some time the last 2 evenings to color a Lacy Sunshine Digital Stamp, her name is Poppy, and she is from the Bloomin Treasure line of digi's. 
I hope you enjoy her as much as I did creating her.


Card Recipe:
Poppy can be found here Bloomin Treasures
Derwent Watercolor pencils
Ink Potion #9 as the blending solution
Clear Wink of Stella for Wings and whites of eyes
Matted on American Crafts Black Woodgrain cardstock
and American Crafts Carrot #71032 cardstock

Everyone have a great holiday.

Sunday, December 13, 2015

Sugar gives you Lacy Wings!!!


Good Morning Dreamers, Well as the title says Sugar gives you Lacy Wings. Whatever could inspire this post? Well yesterday was our Annual Christmas Cookie Exchange party here at the house and cookies are mostly sugar right? Also yesterday was Holiday Saturday Selfie on the Lacy Sunshine Color n Craft Community Facebook page. I posted a selfie video taken after the cookie 
exchange showing the image you get to see this morning all completed but it 
had not been colored in yet. 

Without further waiting I bring you my colored in and completed


Card Recipe:
Printed Rory at 5x7 using a laser printer, then I masked her off using masking glue.  I then took a background stamp with snowflakes and using my MISTI gave her a nice snowflake background. 
Rory was colored using Derwent Watercolor pencils and then further brushed with ink potion #9. 
I used Wink of Stella in clear to accent her hair on the darker pink strands.
To finish her off I foiled her Halo and Button using the tombow glue and minc foil method I have shown in previous posts. 

Have a great Sunday Dreamers!!!

Monday, December 7, 2015

A lil Lacy Enchantress for you all...

Good Afternoon Dreamers.
Well it has just been one of those days where I am seriously starting to think I should not have gotten out of bed, this must be a dream, I am secretly being filmed for a new episode of candid camera, or I am being tested to see how far my patience will stretch!!! So having said all that the best part of my day aside from a sanity check by a dear friend is getting a chance to finish up the card I am going to share with you all today.

I have recently discovered Lacy Sunshine Stamps and joined the facebook page/group for them.  This cutie was given to the group to use as a quick challenge, the theme is "SPARKLY" I love sparkly!!! and I love Lacy Sunshine, match made in crafter heaven if you ask me.  


Card Recipe:
Various Copics for hair and string lights on side of card
Various water color pencils for everything else
Everything sparkly is Wink of Stella enhanced
End of bulbs is MINC Foil over tombow
Sparkle and Sprinkle Cloud 9 for the glittery snow at bottom of card
Crystal Accents on light bulbs and string lights

Saturday, December 5, 2015

Santa is watching you

Good Morning Dreamers,  Well I could not sleep so I decided to do a Christmas card.  I decided to do a Digi Stamp (no surprise right?) but wanted to amp it up a bit.  So I colored the digi with various copics and then I also had the SVG Cut file and cut certain elements to pop on top to give it a more 3D effect.  


As you can see the effect worked!! Super pleased with how this came out.

Card Recipe:

Friday, December 4, 2015

Dr. said rest, so I colored..

Good Morning Dreamers,  I hope this blog post finds you all happy, healthy and grabbing every spare minute you can to relax before Christmas.  As for me I have pretty much been ordered by my Dr. to rest.  As I said earlier this week I fractured a rib riding my quad out in the desert, which then caused me to get pneumonia due to decreased lung capacity.  Well I now have a full blown case of Pleurisy on the right side.  But hey the good news is in the newest x-ray the pneumonia is all gone!! 

I started this Gorgeous Lacy Sunshine digi while I was camping.  I would wake before the whole camp, enjoy a cup of coffee and just color.  I had to put her to the back burner for a few days due to the injury which made me sad because I really like this digi and wanted to finish her.  So this morning she got her final touches and I am sharing her with you today. 


Isn't she just pretty!! She reminds me of when our Stevie was little and always running around with her fairy wings and tutu on.

Card Recipe:
Derwent, Prisma, Prima water colors
Ink Potion #9 blended with fine tip brush
Wink of Stella in clear on hair, flowers, wings, dress

Tuesday, December 1, 2015

Giveaway Winner

Good Evening Dreamers, this is a very short post as I went camping and dirt bike riding this past holiday weekend and decided to crash/roll my quad.  I am suffering from a fractured #5 rib on my right side that is fractured on the back side not the front.  


Nana you have been chosen as the winner of the cards.  I will message you via your blog to get your information. Thank you to all who joined in and look for more opportunities to get my cards for free.

Monday, November 30, 2015

Hedgie and Pumpkins!!

Good Morning Dreamers,  Its has been about a minute since my last post.  Well thanksgiving has come and gone and now I can finally post this cute lil card that was given to friends.  You know how it is that you cannot post some projects before you give them away as the recipient follows your blog.. 


Card Recipe:
Pumpkin Die cuts and Sign from Fall Dies @ Jaded Blossom 
Sentiments are also from Jaded Blossom Harvest Signs stamp set embossed with Ranger Gold embossing powder
Grassy Border is a Lawn Fawn die cut
Digi of the Hedgehog is from Fall Hedgehog Colored with various watercolor pencils and then accented with clear Wink of Stella.

Saturday, November 21, 2015

Happy Saturday

Good Morning Dreamers, it has been quite busy in our home with the holidays fast approaching.  Just seems as if there is not enough hours in the day to get all the things I want to get done, done.

Now if you are reading this post you may have noticed something a lil different on the front page of my blog, you didn't? look again i'll wait for you.  Still did not notice? o.k. well I was chosen to be on the next term Design Team for 
2 Creative Chicks!  I am super excited and am extremely happy I was chosen. So todays post(s) will showcase some (o.k. quite a lot) of the cards I have done in the last week but have not had a chance to get up on the blog until today.

Now with all of that said today's post is a test post for my DT responsibilities to see if my post appears correctly, as I am still a new blogger and do not quite have the full grasp of HTML.  

BEGIN TEST (LOL!)

2 Creative Chicks Showcase TEST POST

This morning I bring you a card that touches on a subject very near and dear to my heart, Breast Cancer Awareness.  


Card Recipe:
Digi Stamp from HOPE Bear
Water colored with Derwent, Prismacolor and Ink Potion #9
Mambi card stock with Awareness Ribbons die cut with CDD Fancy Frames
Stamped with the Faith and Hope stamps from Paper Tray Ink.
Pop Dots to add depth and dimension

I have had a lot of positive response regarding this card with many asking about the technique I used for the foil lettering.  I will do my best to explain how it is done and will make a tutorial for a future blog post on it.  First I water colored the bear and when I was happy with how it looked I took my Tombow glue (white bottle) and brushed it onto the areas I wanted to foil. After drying completely the tombow stays tacky and I then used my Heidi Swapp Minc Foil in small strips on top of the tacky glue pressing down to make sure it was adhered. Peel back the foil and you are left with a very nice shiny effect that to me mimics a mirror or chrome look finish with a bit of dimension. For the letters I had to apply the glue and foil in steps so as not to get pink foil where I wanted silver. If you have any questions please feel free to leave a comment and I will quickly respond.

Don't forget I am still running a GIVEAWAY and all you have to do is follow/like my blog and comment here GIVEAWAY to be entered.  Read the post for further details on how you can earn extra entries.


Challenge#1
Starts Jan. 1, 2016
Ends Jan. 31, 2016
Click HERE to link up!

Thursday, November 12, 2015

Turkey & Cranberries go together like?

Good Morning Dreamers,
Well as the title begs to ask "Turkey & Cranberries go together like?" They go together like KaDoodle Bug Designs and Jaded Blossom.  If you could not tell by the last few posts I am quite fascinated/addicted to digital stamps. They really bring out the creativity in me and studies have shown coloring is quite beneficial for good mental health. And let's face it folks we all can use a good mental health moment every now and again.  So I finished up this cute card this morning and thought I would share it here with you all..


Card Recipe:
Kadoodle Bug Designs Cutie KaToodles Turkey colored with various copic markers, highlighted with white wink of stella to add the faintest of feather/layering to body and wings, Doodle dots in silver for eyes.

Jaded Blossom Fall Dies were used to die cut the leaves from the red and orange panels which were then inked on the edges and pop dots were applied to backs.  I thought it would be kind of fun to switch the leaves up as you can see. The Sentiment is also from Jaded Blossom Harvest Signs stamp set.  I stamped the sentiment on the tag which is from the Fall Dies set also.

Thank you for looking Dreamers and don't forget we still have the GIVEAWAY going on.  Stay tuned for another post showing you a sneak peek at what is included in the giveaway.


Wednesday, November 11, 2015

Fall Owl Digi

Good Afternoon Dreamers, 


I got up extra early and there was a briskness in the air that made me think Fall is definitely here.  Craftin Desert Divas has the cutest Fall Owl digi for free this week so of course it was a perfect fit for my morning.  This card came together so very fast for me, I just had it visually in my head ready to go.  I am giving credit to Tanya Hahn for telling me to go traditional with my color palette.  I hope I have achieved it.  I am sure she will let me know.. 


Recipe for the card:
Fall Owl Digi from CDD Colored with various colors of copic markers, highlighted the flower, beak, & eyes with clear wink of stella. I gave the wings their feather like appearance with a brown wink of stella that I just lightly flicked on to give depth.
Brown, Red, Yellow panels were stamped with BoBunny and Jaded Blossom stamps using Stampin up Mossy Meadow then I went back over the top with versamark.  The iridescent embossing powder was then applied and heat set.
Ranger Crystal Accents were applied to the letters FALL, the owl's beak, eyes, & center of the sunflower.
Lastly I used foam dots on the back of the owl and affixed him to the front of the card.

Don't forget I am running the giveaway until December 1st clicking here GIVEAWAY will take you right to the post with all the details.

Thanks for looking Dreamers and enjoy the rest of your weekend..

Tuesday, November 10, 2015

GIVEAWAY!!!

Dreamers, I just love my Craftin Desert Divas stamps, dies, & digis! I use them so much on so many projects.  If my previous posts have not compelled you to stop on over I encourage/entice you with a couple more cards I created this past weekend!!! Again here is a direct link to the Craftin Desert Divas online shop Craftin Desert Divas 

Now for the giveaway!!! I am going to give away this card along with a few others (sshhh it's a surprise, but check back in future posts of the cards to be given away) to one lucky follower of my blog.

How you can win...
1. You must follow my blog
2. You must comment on this post
3. Extra entry available if you share my blog and refer a new follower, (just have them mention your name in the comment section)
4. Extra entry if you share my blog on your FB or personal blog, just make sure to post a link in the comments letting me know.

Deadline will close December 1st 2015 with a winner chosen by random number generator. If I can get 100 followers I will do 2 Giveaways.  Good Luck and thank you for all of your support!!!


Can't get enough of this Fox Digi

Dreamers, what can I say I loved this lil fox did from Craftin Desert Divas so much I had to create a second card!!! 


I gave this card away to a friend who needed a lil pick me up, she loved it!!! I also think I have made her a Craftin Desert Diva shopper!! LOL anything to help a friend right??

Recipe for card:
CDD Little Lovelies Umbrella Fox Digital Stamp
CDD The Sky is the Limit stamp set - Sentiment and Umbrella stamped background
CDD Sequins 
Various colored copics
Wink of stella for eyes and heart
Ranger Glossy accents for eyes and heart


Craftin Desert Divas now has Digis!!!

Dreamers, boy have I got some fun news to share with you!! Craftin Desert Divas now has Digi Stamps!!! Digi stamps are a great fun way to get an adorable image without having to buy the whole stamp set.  they upload beautifully into Cricut Design Space where you can do a print & cut.  You know what this means right? NO MORE FUSSY CUTTING!!! You can size the digi whatever size you like in Design Space and print, cut, color, CREATE!!! I am just loving Digi images lately.. So hop on over to Craftin Desert Divas aka CDD and get some digi stamps of your own!! Here is a card I created using one of their uber cute digi's.


Recipe for card:
CDD Little Lovelies Umbrella Fox Digital Stamp
CDD The Sky is the Limit stamp set - Sentiment
CDD The Sky is the Limit stamp set - Clouds
CDD Outdoor Landscape Die set - Grass border used as a mask
Various copics for coloring
Wink of stella for sparkle in the eyes, purple heart, & polka dots on umbrella
Ranger Glossy accents on top of eyes, heart, umbrella polka dots.

Fall is here and I have been busy - Lacy Sunshine Rosalind

Good Morning Dreamers!! Why yes that is what I am now going to call everyone who follows my blog.  I had been struggling/thinking of how to address you all and make you feel special, because well you all are if you are taking the time to read this.  So without further delay I am sharing a few projects with you today.  Yes they will be in a few posts as I really want to give each project it's share of the spotlight!!


First up is this water colored Digi, she is from Lacy Sunshine and her name is Rosalind I fell in love with her and knew she would be perfect for a very dear friend of ours.  She was colored with Derwent water colors and then I used a fine detail brush dipped in Ink Potion #9. Her jagged edge is from Jaded Blossom - Winter Die Set . I then made some petite sparkly brown tulle rosettes and affixed them to the edges with black brads. To complete this card I used foam pop dots to really give the whole layer lift from the black base which is American Crafts card stock. 

Sunday, October 25, 2015

October Birthday's

Well it seems so many of my friends have birthdays in October that I am unusually busy making cards for birthdays in this month.  I created this card for a friend who just loves all things Halloween and whose birthday falls in the month of October.  Each Halloween she and her husband throw a very fun Halloween party. Their whole house is decorated very spooky with lots of Nightmare Before Christmas memorabilia which they actually leave it year round.  

I created this card using the Elizabeth Crafts pop it ups round die.  I then used the coordinating die for the decorative edges which I cut apart to give a grunge dismantled feel to the card. The Jack faces were created by me using my Cricut Explore Air by taking a jack face and slicing it into a circle.  While it is very hard to see in the picture I had used a piece of white cardstock that was affixed with a sheet of double sided tape. After cutting the jack faces I removed the tape and applied Sparkle & Sprinkle Cloud 9 velvet/micro fine glitter.  Affixed to card base and done!!


Buutt! I could not stop at the front of the card!! I took the part of the Jack face that was removed from the initial cut and since it was already affixed with the tape decided to add Sparkle & Sprinkle Waterscape to the face elements, ran them through my xyron and affixed to the back of the card.. My friend loved the card so much.  It is such a good feeling when people you give cards or projects to really enjoy them. 

Happy Halloween, well almost!!

Good Morning my blog!!! It's rather chilly here in our lil part of California which makes me want to spend more time indoors and in my craft room.  So with that being said I wanted to show you a couple things I have been working on. First up is a Halloween card created for a friend. 


Isn't she the cutest!! This is a Unity Stamp called Greta Whimsy, colored with Derwent water colors, then turned into a shaker card using Craftin Desert Divas Fancy Frame Dies These dies make it so easy to make shakers even I could do it!!! I used to find them so intimidating but am now truly addicted to making them..

Next up is a cute lil card.. I know you are thinking Christmas?? But yes I am hosting a card crafting party and wanted to make Christmas cards as the theme.  So in the upcoming posts I will post a new one that the crafty friends will be making.. 


Sunday, October 18, 2015

Scary Treat #3

Last Halloween treat up on the blog today is some lil treat bags filled with various candy and snacks.  I used a food safe airbrush and food coloring to give the candy corn and white chocolate chips a creepy look to them.  The die cuts and stamps are from Jaded Blossom.


Scary Treat #2

Halloween Treat #2
Once again I am using a file from SVG Cutting files called Candy Corn Box  This one was kind of tricky to get all sized up but once I did all went well, I used my cricut to add a cutout of a bat so you could see the contents of the box, then placed a piece of acetate behind the cutout.  You will need a lil piece of tape on the bottom to keep it closed because the weight of the candy made it want to pop open.  I used a sentiment from Jaded Blossom stamped on a lil tag, tied a piece of trendy twine and then affixed with a glue dot.  Can we say Yummy!!!


Scary treat #1

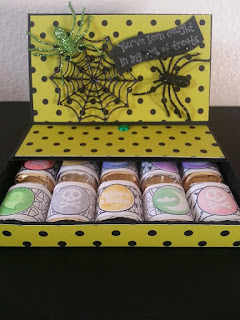
Good Morning Friends!! Today is going to be a triple blog post day as I want to give each little project it's own post!! 1st up is this cute little Nugget Easel Box super fast and easy to create.  I used Jaded Blossom stamps for the sentiment, nugget wraps & a Jaded Blossom die for the spider web.  This is one cute treat that is sure to please!!


Saturday, October 17, 2015

Cards from the Craft Desk

Good Morning,  Bringing you a couple of cards from the craft desk this morning.


All papers and stamps are BoBunny

Have a great Saturday

Friday, October 16, 2015

Happy Birthday

Good Evening everyone!!!! 

Just a quick post showing a birthday card for a friend who also shares their day with Halloween!!


For the card I chose the Cauldron Owl from the Cutie Katoodles Witchy Owl file set, isn't it just the cutest ever!! If you would like to make one you can get the file here KaDoodle Bug Designs .I cut all the pieces on my Cricut Explore using a mix of American Crafts cardstock, and Michaels shiny metallic cardstock. I inked all the edges and then applied Glossy Accents to the bubbling goo, her feet, beak, buckle, and the lil star on top of her hat. Finished her off with a couple of black doodlebug enamel dots for her eyes and she is ready for her debut in a couple of weeks. Ssshhhhh don't tell my friend.. Have a great weekend everyone!

Keep
Calm
and 
Craft
ON!

Saturday, October 10, 2015

Friday Fun and Fan Showcase

Good Morning friends!! 
I know the title says Friday Fun and it is technically Saturday morning, but you will understand in a few.. 

I created a cute tag for the challenge in the KaDoodle Bug Designs FB Group KBD Challenges . Now I try to enter these as often as I can.  Not with the hopes of winning but because I just love this companies cutting files so so much.  Their files are some of the easiest to import into Cricut Design Space, easiest to cut at just about any size, & they are just IMO some of the cutest files ever!! So with that being said, I saw I only had a few days left for this current challenge which is "TAGS!" I love to make bookmarks to give away to family, friends and even Leonard my postman has one! So Tags is right up my creative alley!! So I set down to create a TAG and really wanted to make it simple and fun.  I chose to use the cute Witch Pumpkin for the file Cutie KaToodles - Witchy Poo Cow I cut the pieces with my Cricut Explore Air, created the tag itself using a file in the DS Library.  I then stamped a fun cobweb pattern on the background of the tag, inked all the edges of the Witch Pumpkin using the new PREMIUM CHALK INK PADS then I drew on the stitching with a distress marker in Picket Fence.  Here is a picture of the completed TAG.


I uploaded a picture of the completed TAG to the FB Challenge page and also to the main KaDoodle Bug Designs Fan Page KBD FanPage .  Imagine my surprise when I woke up this morning and found out that I had been chosen as one of the recipients of this week's Fan Showcase. Each week the owner of KBD chooses 1 or 2 projects posted to the fan page to showcase and highlight.  There is always so so many beautifully done projects and the crafters who create these projects provide so much inspiration.  I am humbled that my lil tag was chosen.  I also get to display this cute badge on the blog!! 


In closing readers I do hope you will stop by the FB Groups I have provided links for up above, buy the files from KaDoodle Bug Designs and last but not least Have a Great Saturday!!!


Friday, October 2, 2015

Halloween and Breast Cancer, What do they have in common?

October is not just the Spookiest month of the year, it is also Breast Cancer Awareness month!! I am a huge supporter of Breast Cancer Awareness and love to combine Halloween and BCA into projects that I then raffle off with 100% of the raffle monies going to the Susan G Koman Foundation. This is an excellent organization that provides resources to every woman regardless of financial situation.  I hope my project inspires you to do something to help raise awareness in your own community and if you have a moment make sure to visit the link in this post for information and resources for either yourself or a loved one.. Thank you all for looking..


This Witchy Jack O Lantern was created using the SVG Cuts file from the Haunted Forest set.  All the printed paper is from MAMBI. All parts of this project were cut using a Cricut Explore Air.  

Friday, September 25, 2015

Mummy Treat Cups and a Treat for you for free!!

Good Morning Everyone!!

Today I am bringing you a Treat with a special Treat!!  I created these cute little Mummy Treat boxes in Cricut Design Space.


I cut the white cardstock and left it on my cutting mat so that I could use my E-Brush and Spectrum Noir Markers to give the layers some dimension. The Marker colors are indicated if you wish to follow my lead, otherwise you can use daubers and different ink/chalks to edge all the pieces.


Next I cut/scored the base of the box with my Explore, then assembled the box.  Assembly was fast and easy just fold everything on the score lines, add a tiny bit of glue on the shorter tabbed edges and adhere to the front and back of the box.  I then assembled the front layer aka the Mummy layer and attached with some double sided tape.  Googly eyes were added to make them fun.  Fill with candy or other treat and enjoy!!


What's the Free Treat you are asking yourself?  Well I am giving you the Design Space file for free!! You must have the Subscription in order to cut the Box itself, but if you choose to only use the Mummy layer you will be able to cut with no problems as this whole layer was created using all FREE IMAGES.  You will need to delete or hide the box layer itself in order to cut the Mummy layer 100% FREE!!  All I ask is that you take a moment to comment and follow my blog!!  I will be doing lots of Cricut Design Space created files that I will be giving you access to free.  Enjoy and make sure to LIKE/Follow..

Click the link below to access the file

Monday, September 14, 2015

Fall seems to be coming in at a nice slow pace which is making me want to stay in and craft more.  Today I am sharing two watercolor cards I created.  Sorry in advance for the poor lighting as I forgot to grab these before I gave them to my parents and had to take the pictures after they had them..  Enjoy and thank you for looking..


Hippo card created for my mom using Derwent watercolor pencils, and the Hippo Birdie stamp you can find here Hippo Birdie  My mom has collected hippos since she was a small child so choosing this stamp was a no brainer


TuTu Toad watercolor card created for my dad using Derwent watercolor pencils and the stamp is from stampendous.  I love Toads along with most other things girls are not supposed to like such as Dragons, Lizards, Snakes.  I was such a tomboy growing up, you would never have found me willingly in a TuTu so this was fitting for my dad as he has always inspired me to dance as if no one is looking..


Sunday, September 13, 2015

Good Morning!!!

As I promised to blog more I am posting this cute lil Halloween card.  I created this card for an upcoming card class I am teaching.  The base is from a file from SVG Cuts, and the skull was added.  I e-brushed my skull and then used some chalks to give him a bit of depth 


Thursday, September 10, 2015

Well Hello Old Friend

It has been a little while since I have blogged about anything I have created but that does not mean I have not been super busy creating lots of cute, fun projects.  I have also been busy teaching paper crafting classes at 2 of our local scrapbook stores each month along with doing a few in home craft parties.  

If you are reading this I am making you a promise right now to be more diligent in posting at least 3 times per week!! So with that said here are some pictures to keep you looking until my next post.  

The first 2 pictures are Dragons from KaDoodle Bug Designs using the Knightly Kisses file.  I love Dragons, the color purple, and glitter!! So this project was a perfect fit for me.. I stuck the magnets on her back and she now greets me every morning from her view on the fridge!!


Next up is another Dragon also from KaDoodle Bug Designs, he was a freebie that was shared when the KDB Fanpage on FB reached 11K members/followers.  


Here is yet another KaDoodle Bug Designs file (I just love their files!!) I created this cute lil bookmark using only the worm from the file Apple Bookworm.  


Template by BloggerCandy.com | Header Image by Freepik